
How to set up brand styles and apply them to your emails
Why use brand styles
Your incentive emails should look like they come from your brand, not from a template. Brand style settings let you set your colors, fonts, corner radius, and image assets in one place, see them in a live preview, and then push those styles onto existing emails without rebuilding them. Set it up once and every new and existing email can inherit the same look.
Brand style settings has two tabs: Styles, where you define the look, and Emails, where you apply that look to your journeys and individual emails.
 Part 1: Define your brand styles
Step-by-step guide
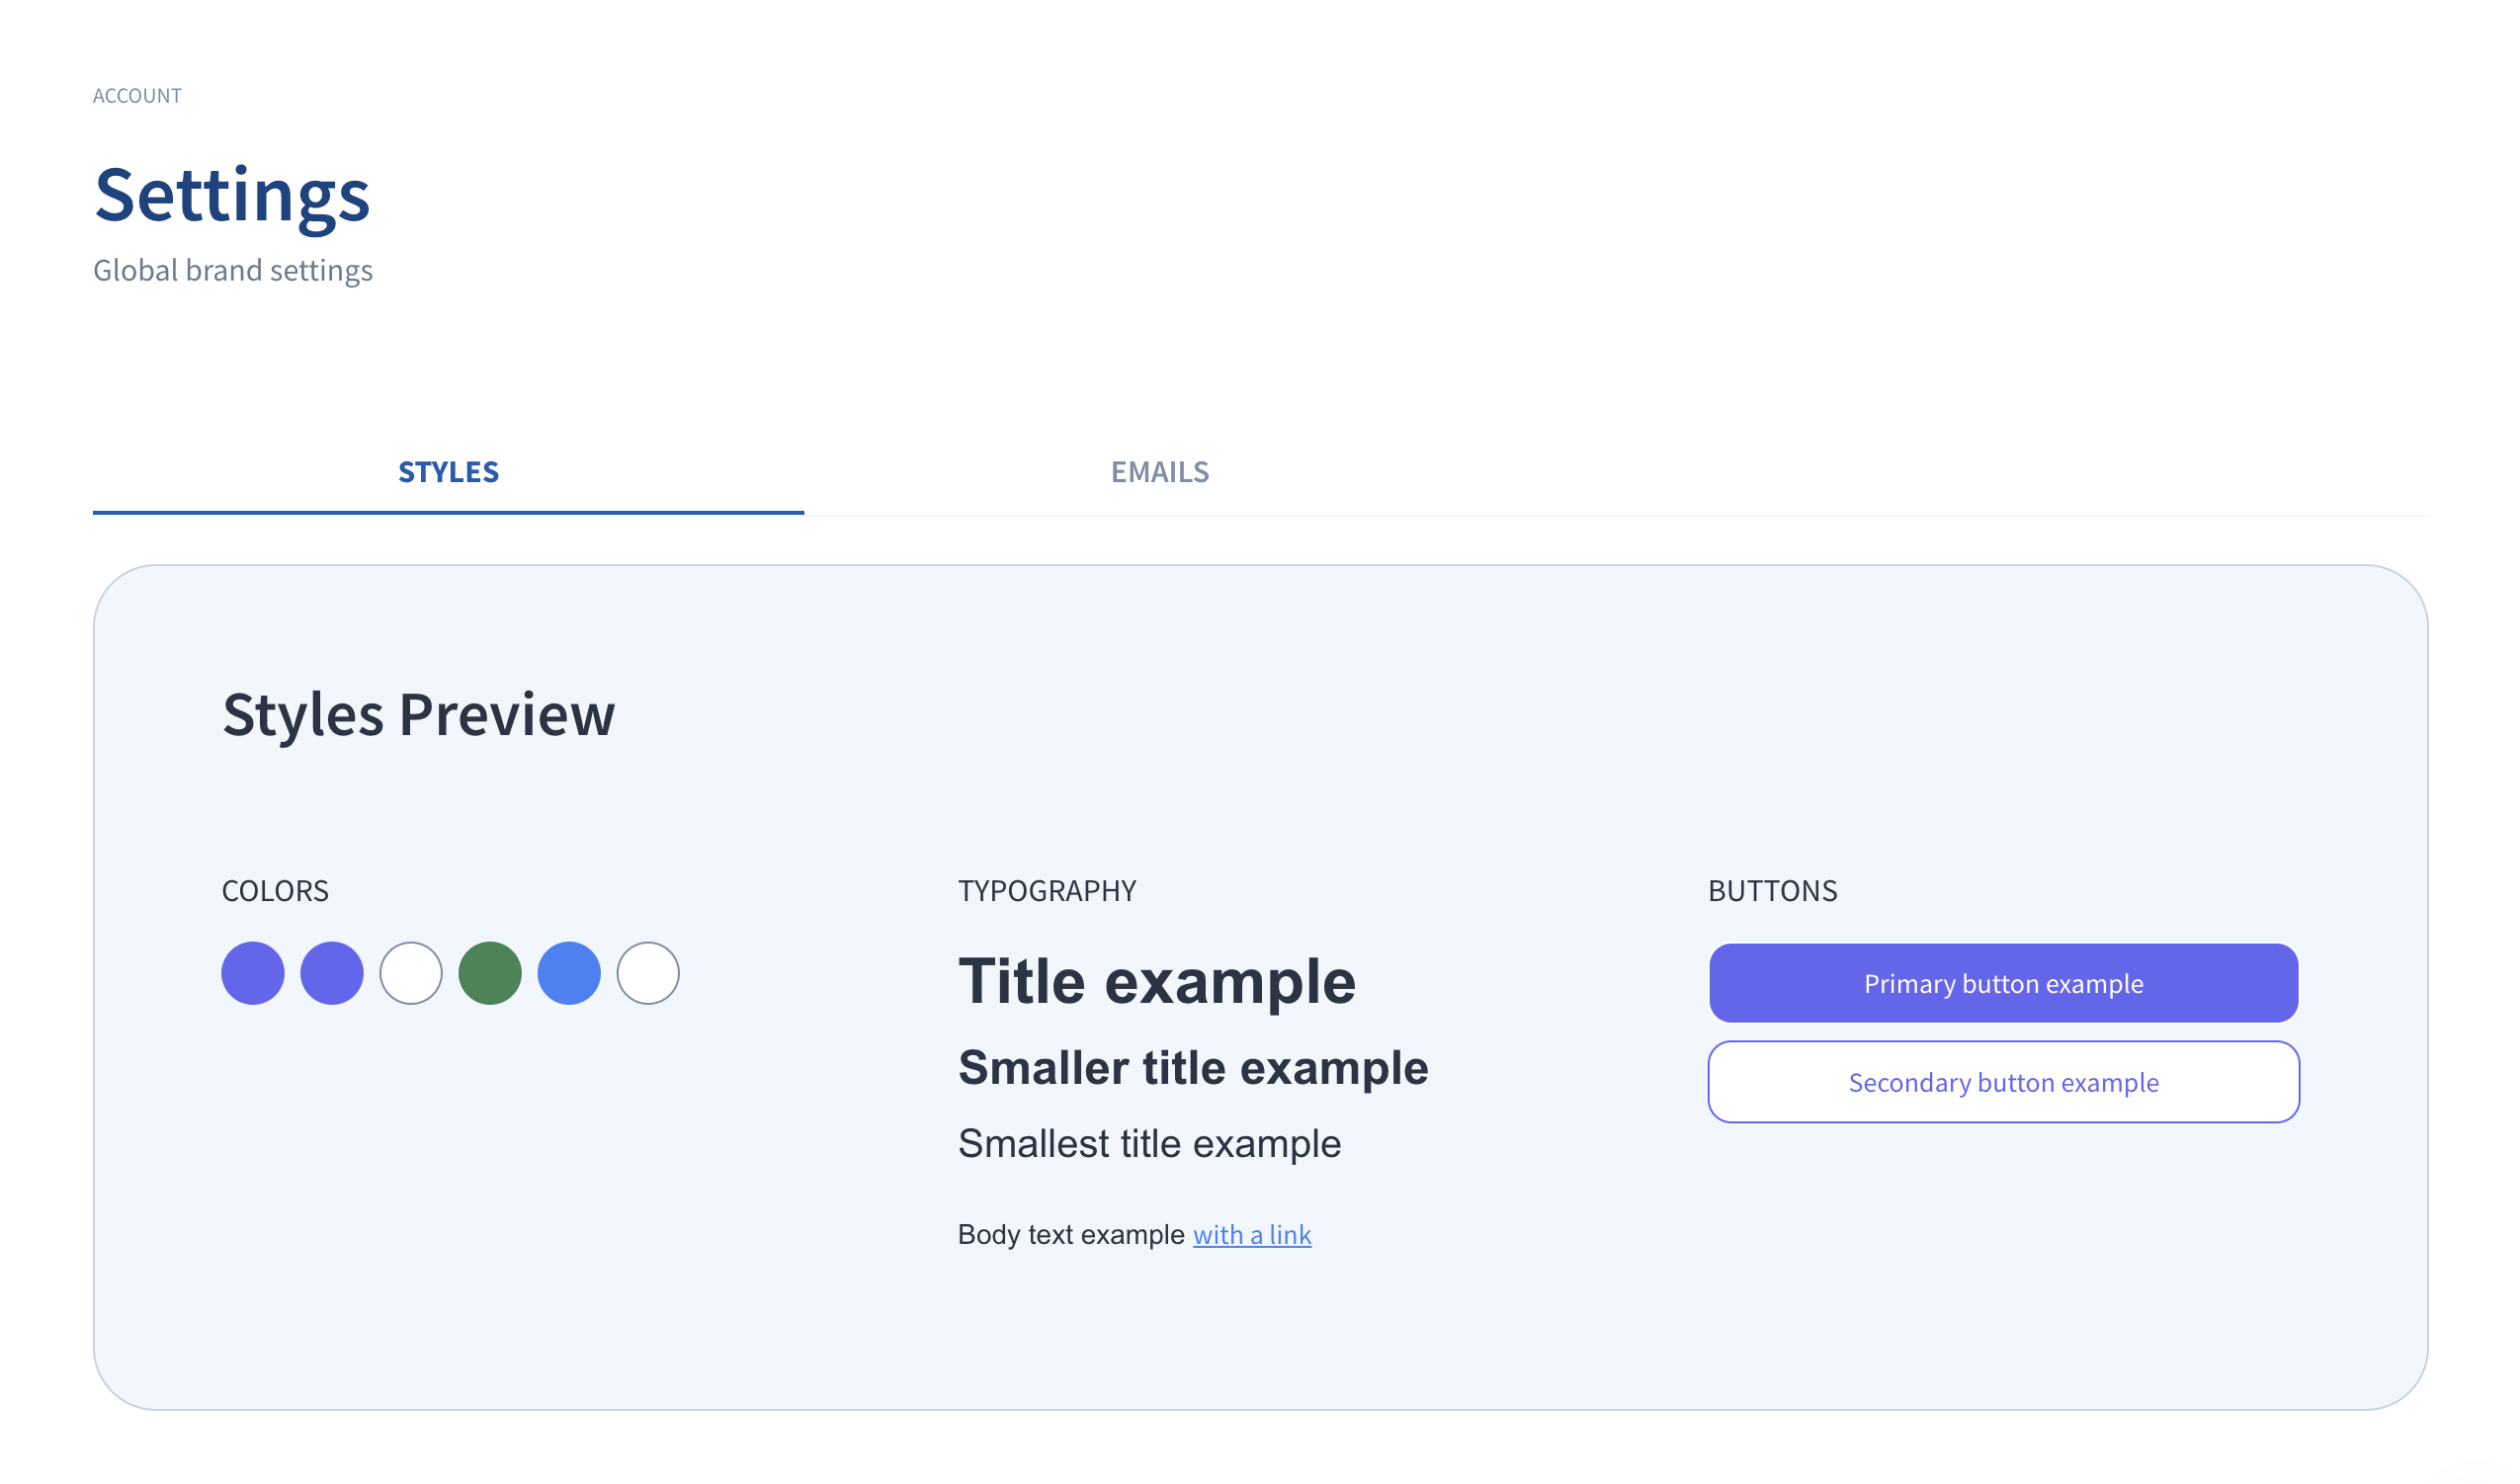
- Navigate to Settings in the left menu, then open the Styles tab. You will see a Styles Preview panel at the top that reflects your current colors, typography, and buttons in real time.
Set your colors in the Colors section. For each color, either type a hex value or click the swatch to pick a color. The colors you can set include:
As you change each value, watch the Styles Preview update so you can check contrast and readability before saving.- Primary color (email and web)
- CTA color and CTA text color (email and web)
- Hyperlink color (email and web)
- Info color (email and web)
- Background color (email only)
Choose your typography in the Typography section.
- Select a Font for paragraph text from the dropdown.
- Set Paragraph size and weight.
- Set Heading sizes and weights for H1, H2, and H3 (these apply to web).
- Set the Button font size and weight (web).
- Set your shapes in the Shapes and Layout section under Corner Radius. Enter a CTA Radius and a Table Radius in pixels to control how rounded your buttons and tables look.
Manage your image assets in the Assets section. These images are reused across your emails:
To change an asset, click Upload Assets (or the asset's menu) and either upload a new file or pick one from your asset library in the Choose an image window. You can also download any asset from its menu.- Save your changes. A confirmation appears at the top of the screen reading Brand styles saved successfully.Show Image
Part 2: Apply your styles to emails
Saving your styles updates the global settings. It does not automatically rewrite emails you have already built. To push your latest styles onto existing content, use the Emails tab.
Important: For emails inside a campaign to change, each campaign has to be updated individually. Brand style changes are not pushed to live campaigns automatically. This protects the integrity of your campaign versions and any special, campaign-specific designs, so a global style change never overwrites a bespoke campaign without your say-so.
Step-by-step guide
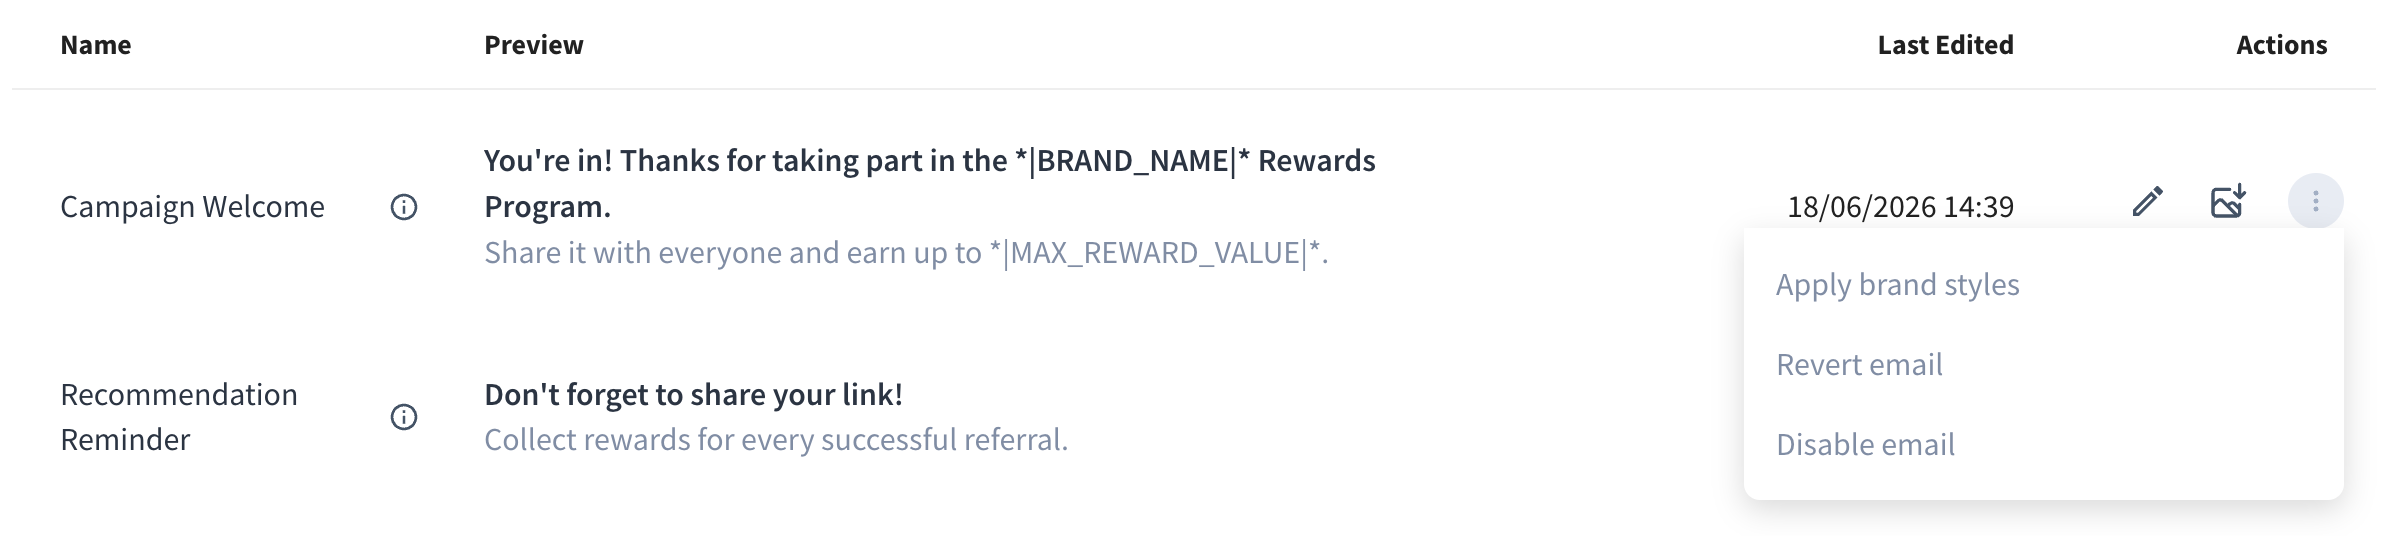
Open the Emails tab in Settings. You will see your journeys (for example, the Referral Referrer Journey) with their emails listed by Name, Preview, and Last Edited.
- Choose what to update. You can apply styles to a whole journey, or open the three-dot Actions menu on a single email. From here you have two key options:
- Apply brand styles applies your latest brand styles and assets to the journey or email without changing any other content. It swaps only the values that match your previous brand settings, so custom colors that were never part of your brand settings are left untouched.
- Revert email (or Revert all emails at the journey level) resets the email content back to the default global template and then applies your current brand styles and assets. Use this when you want a clean, default layout, not just a color refresh.
Click Apply brand styles. A confirmation window opens titled Apply brand styles with the message This will change: Matching values are swapped for your brand settings. It shows each change as Current on the left and New on the right, so you can see exactly which colors and styles will be replaced before anything happens.
- Review the changes, then click Apply Brand Styles to confirm, or Cancel to close without changing anything. Note the reminder in the window: only elements that use the current value will change, so if an element does not update, it simply was not using the old value.
💡 Best practices
- Set your styles before you build emails. Defining colors, fonts, and assets first means new emails start on brand and you have less to apply later.
- Use the Styles Preview. Check colors and typography in the preview panel before you save, especially CTA and text color combinations, so your buttons stay readable.
- Prefer Apply brand styles for a refresh. It keeps your content and only swaps matching brand values. Reserve Revert for when you genuinely want to return an email to the default template.
- Upload a new asset instead of expecting a delete. Assets cannot be deleted on purpose, because an image may be in use across many emails. Upload a new version and apply it rather than removing the original.
- Read the confirmation window every time. The Current to New view is your last check before styles are applied, and it tells you precisely what will and will not change.
🛠️ Troubleshooting / FAQ
Q: I clicked Apply brand styles but some elements did not change. Why? Apply brand styles only swaps values that match your previous brand settings. If an element used a custom color that was never part of your brand settings, it is left as is. Check whether that element was ever on the old brand value.
Q: What is the difference between Apply brand styles and Revert? Apply brand styles keeps all your existing content and only replaces matching brand values (colors, styles, and assets). Revert resets the email content to the default global template first, then applies your current brand styles. Revert is the more destructive option, so use it only when you want the default layout back.
Q: I cannot delete an image asset. That is by design. Because an asset can be used across many emails, deleting it could break other emails without warning. Instead, click Upload Assets to add a new image, then apply it where you need it. You can still download existing assets.
Q: My asset upload was rejected. Check the file requirements: the hero image should be a PNG, and each asset has a maximum size of 2MB. Reduce the file size or convert the format and try again.
Q: I saved my styles but my emails still look the same. Saving updates your global styles only. To update existing emails, go to the Emails tab and use Apply brand styles on the journey or individual email.
Q: I updated my brand styles but my campaigns did not change. For emails inside a campaign to change, each campaign has to be updated individually. Brand style changes are not applied to live campaigns automatically. This is intentional: it preserves the integrity of your campaign versions and any special campaign-specific designs, so a global change never overwrites a bespoke campaign. Open each campaign and update it to bring in your latest styles.
🔗 Related articles
- How to Navigate the Transactional Emails
- How to Manage Brand-Level Emails
- How to Customize Campaign Emails