
Managing your Account Balance
The Balance page is your single source of truth for all financial transactions related to your incentive programs. This powerful tool gives you full transparency over your account activity, including global and program-specific balances, with advanced filtering capabilities designed to streamline your internal reconciliation processes.
Step-by-Step Guide
Navigating to your
Navigate to the Finance section under Account in the left-hand navigation bar.
Toggling Between Views
You can choose how you want to visualize your financial data using the View filter located above the balance table.
Month View (Default): This view simplifies your dashboard by showing one line per month. It is ideal for high-level reconciliation. The table will display:
- Month: The period covered.
- Payins: Total funds added to your account.
- Total Costs: Costs for Rewards and Fees combined.
- Refunds: Total amount credited back to your bank account, thus draining your account balance.
- Monthly Sum: The net change for that month.
- Balance: Your total account balance at the end of that month. This represents the sum of the previous month’s balance and the monthly sum.
Day View: Switch to this view to see a chronological list of every individual transaction, including specific reward payouts and top-ups.
Understanding Your Balances
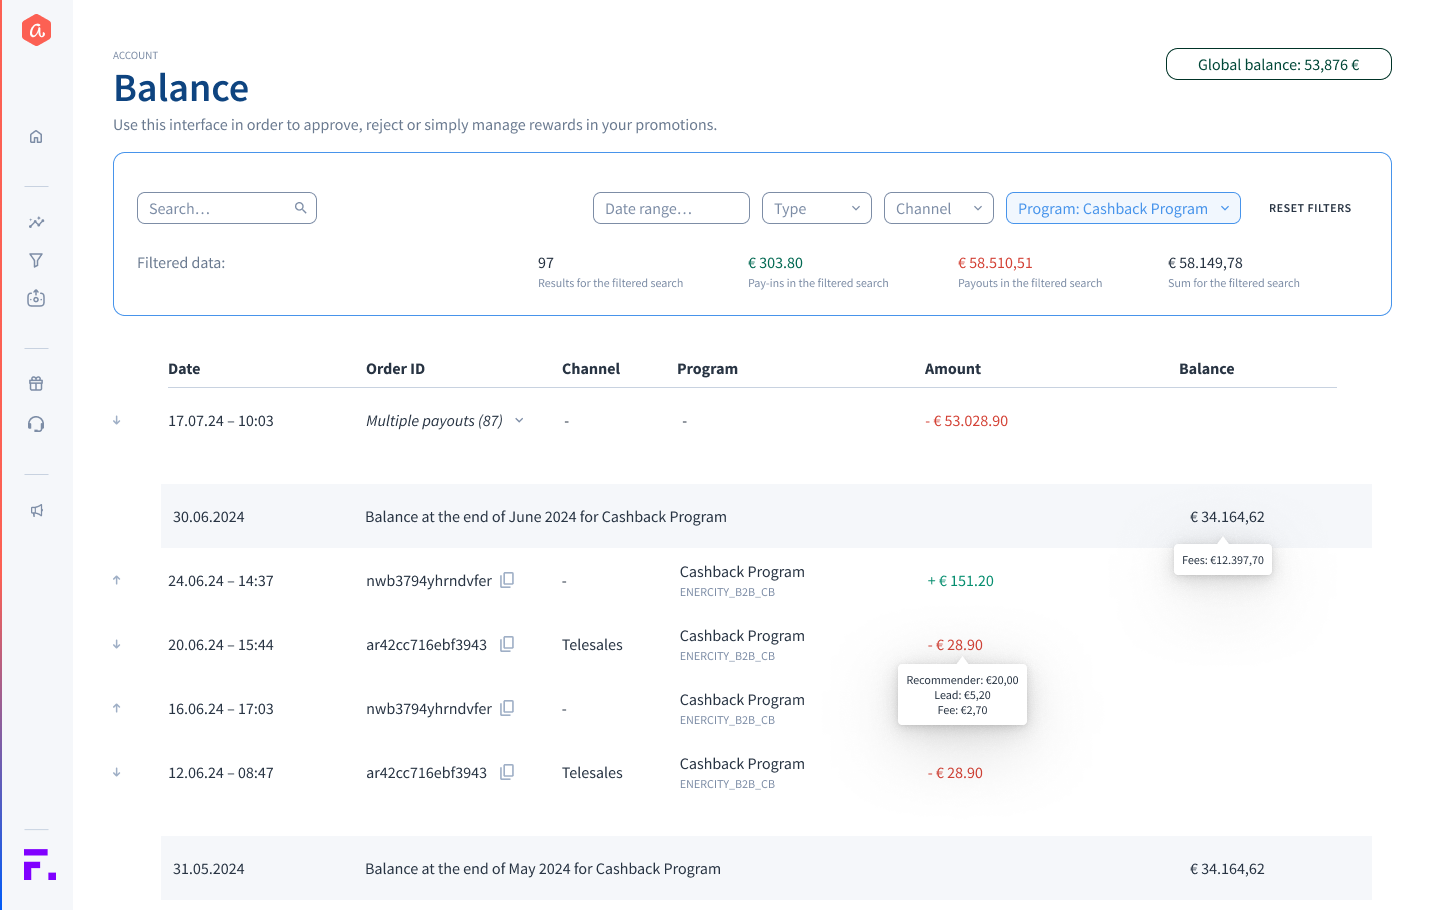
- Review the Global Balance. The Global Balance displayed in the top right corner represents the current total balance across all programs in your account.
- Check Monthly Summaries. Scroll through the main transaction table. You will see clear, bolded rows that automatically summarize the Balance at the end of Month for the current set of applied filters, providing easy month-end reconciliation points.
- View Transaction Details. Each row represents a single transaction. Hover over the Amount column to view a detailed breakdown of the value, including the Recommender reward, Lead reward, and Fee applied to that specific transaction.
- Quickly Copy IDs. For fast look-ups, simply click the copy icon next to any Order ID to copy the unique identifier for use in the Reward Management Search or external systems.
Using Advanced Filters for Reconciliation
The filtering panel allows you to quickly segment transactions to match your specific internal reporting needs.
- Filter by Program. Click the Program dropdown to select one or more specific incentive programs you wish to review.
- Filter by Channel. Use the Channel dropdown to filter transactions by their Sales Channel (e.g., Online, In-store, Tele-sales)
- Note: This feature is critical for teams reconciling payments based on the channel that provided the budget.
- Filter by Date Range. Click Date Range to select predefined periods (like a month or quarter) or define a custom period to perfectly align the data with your internal accounting cycles.
- Filter by Type. Use the Type dropdown to isolate specific types of financial movements:
- Pay-ins: Funds deposited into your Aklamio account.
- Rewards: Funds paid out for rewards and fees.
- Refunds: Funds refunded from you Aklamio account to your company bank accounts.
- Review the Filtered Data Summary. Immediately above the transaction table, a summary panel dynamically updates to show:
- The total number of results found.
- The total Pay-ins for the filtered data.
- The total Pay-outs for the filtered data.
- The overall resulting Balance for the transactions currently displayed in the table. If you filter by just the Program this will represent the actual balance of a specific Program.
Exporting Monthly Reports
To download your financial data for offline accounting:
- Ensure you are in the Month view.
- Click the Export Monthly Report button (in the upper right above the table).
- A CSV file is downloaded. This file includes a detailed breakdown of:
- Top-ups and Refunds
- Total Costs (further split into Rewards and Fees)
- Monthly Sum and Closing Balance
💡 Best Practices
- Channel Reconciliation: If your organization tracks budget and performance by sales channel (e.g., separate budgets for online vs. call center referrals), ensure you assign a Channel to your Pay-in transactions. This allows you to use the Channel filter to view the balance exclusively for that segment, simplifying budget reconciliation.
- Connecting Financials to Rewards: If you are using the ID search or copy function to investigate a specific reward transaction, navigate to Operate > Reward Management and use the same ID in the search bar to find the full reward validation history.
🔧 Troubleshooting
Why can't I see a balance for a specific Channel?
If you filter by a specific channel, the system can only calculate a true balance if the corresponding Pay-in (budget deposit) was also tagged with that same channel. If channels are not assigned to your pay-ins, the channel filter will primarily reflect pay-outs (rewards and fees) and may not show a fully reconciled balance.
Why did my view switch from 'Month' to 'Day' automatically?
The Search and Type filters are designed for granular investigation. When you use these, the system assumes you are looking for a specific transaction and switches to the Day view to provide those details.
Does the Date Range filter change the 'Monthly Sum'?
In the Month View, the Monthly Sum always represents the total for that calendar month, regardless of the specific date-range selected, to ensure accounting accuracy.